Providing you have MailVibes activated on the main email account that you log into, you can use it with any other “send from” email address/alias that you have set up for that email account. There is no need to configure anything extra in your MailVibes settings.
MailVibes
Email tracking for Gmail by MailVibes

There is no sign that your sent email is being tracked. For email tracking, we use a code snippet that is not visible to the recipient (s)
To ensure MailVibes works correctly, we recommend that you upgrade your browser to the latest version.
MailVibes is compatible with Google Chrome. Click the links below to download the latest version:
Tip: Click here to find out which browser you are using.
If you want to deactivate email tracking by default, just follow these steps:
1.- In the upper left, click on the MailVibes icon ![]()
2.- Choose the Configuration option
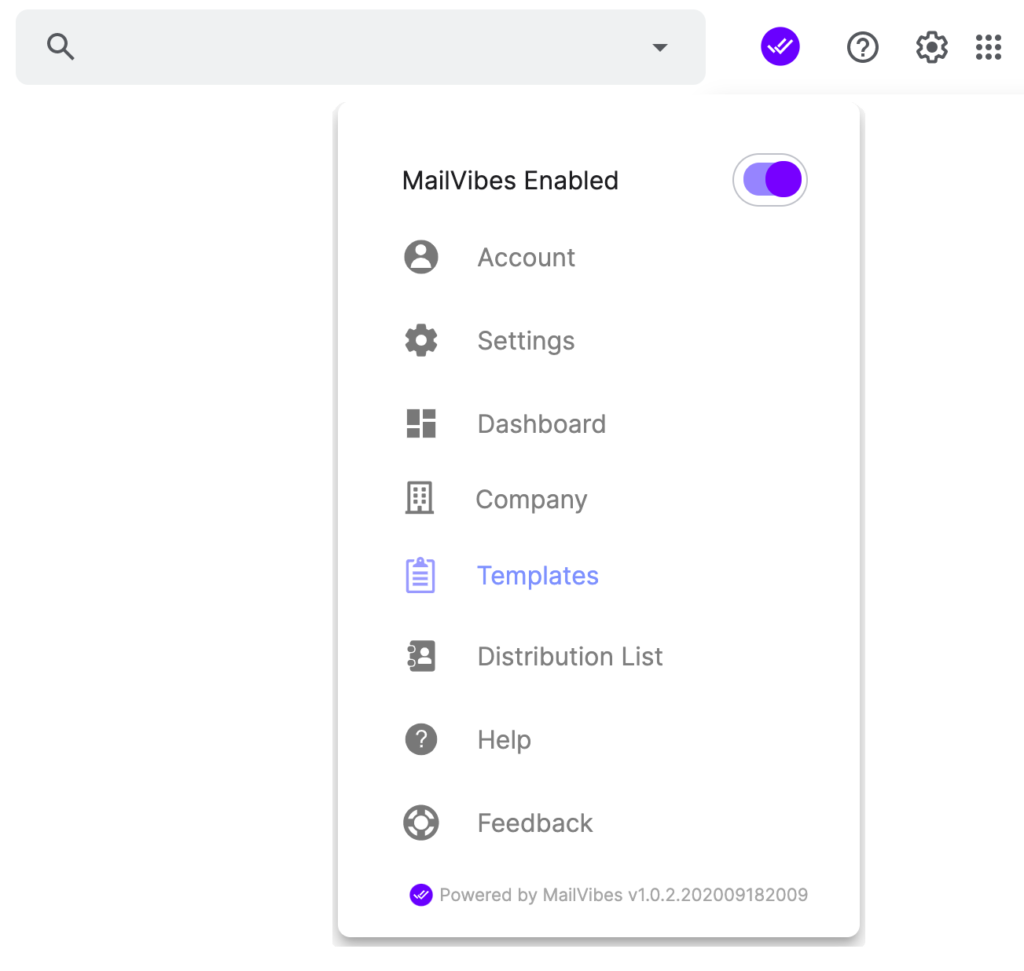
3.- the next section will open
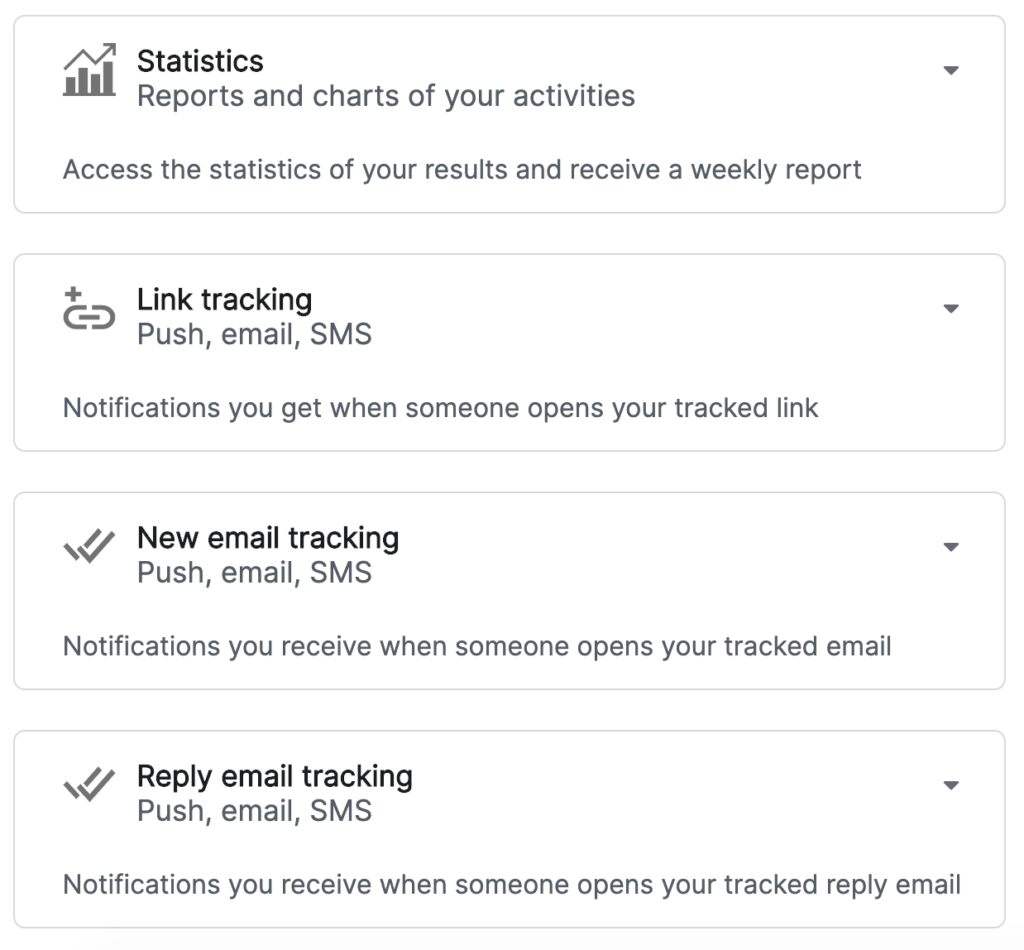
4.- Click on the type of activity that you want to silence or activate and the following menu will open for you to select the type of alerts you want to receive
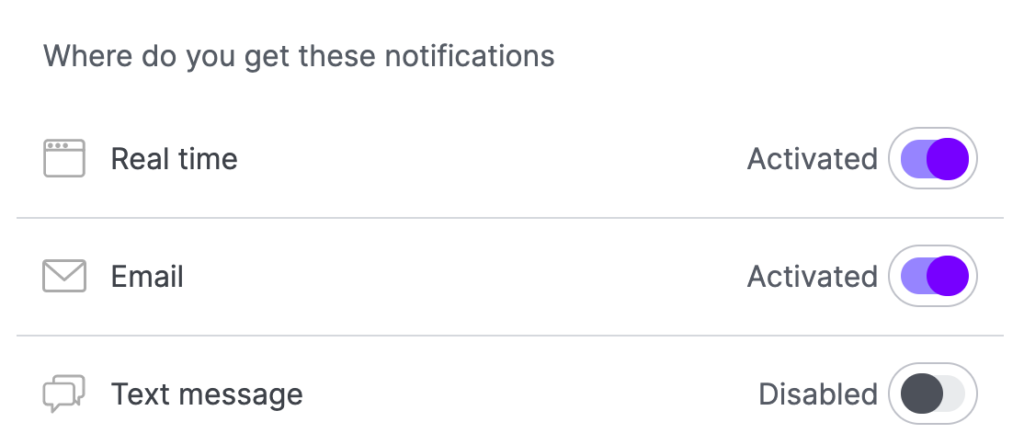
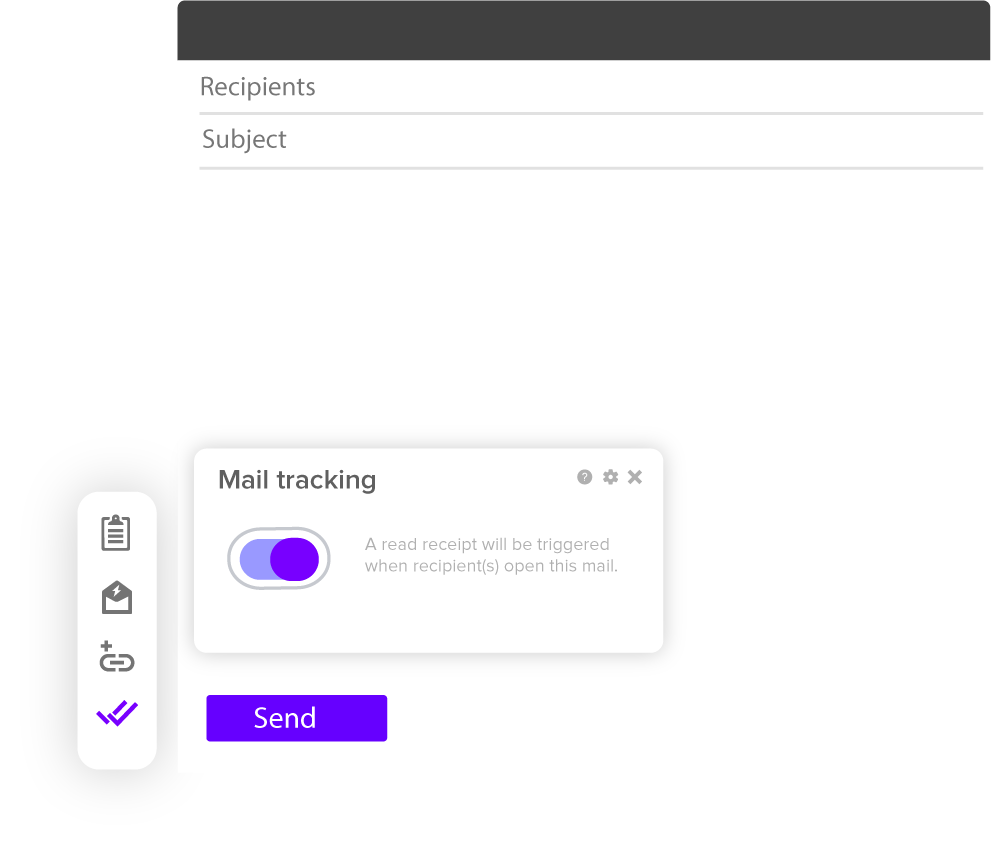
5.- In the Tracking section, you can disable the default email tracking option for new emails and for email responses by clicking on the icon![]() When off, the option looks like the following icon
When off, the option looks like the following icon ![]()
If you want to send a particular email without our tracking, click on
![]()
This is found in our menu on the left side of the Gmail compose window, before sending the email, click the option to disable tracking
Most problems with MailVibes can be solved by uninstalling then reinstalling the MailVibes extension on your browser. To do so:
1) In Chrome, click More (the three dots in the upper right corner of your screen).
2) Go to More tools > Extensions.
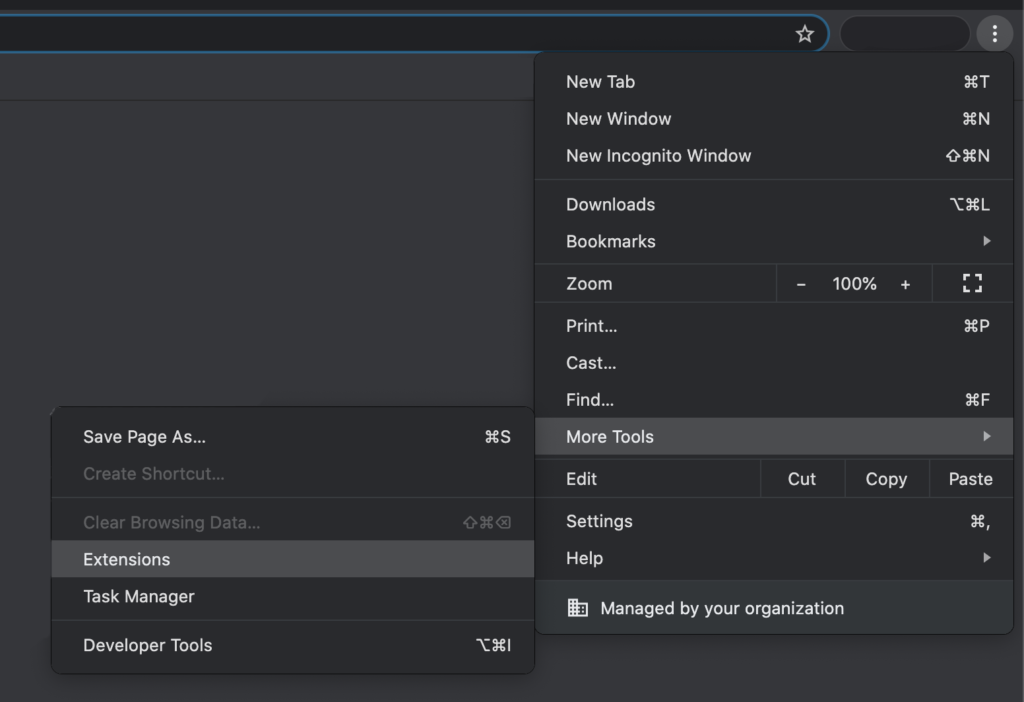
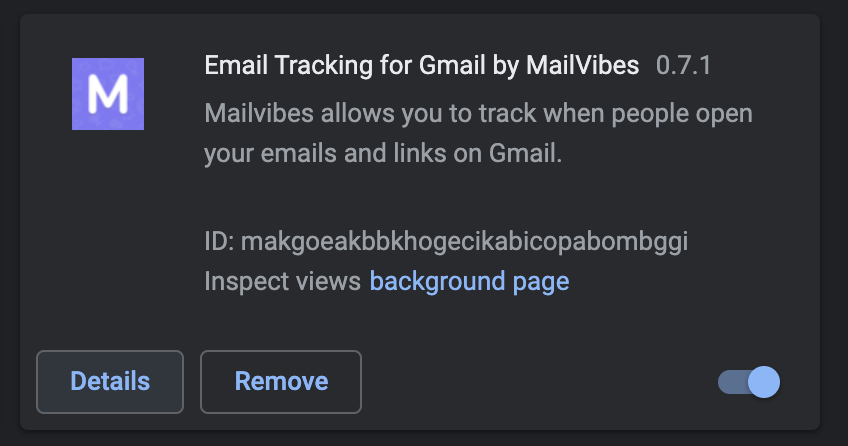
3) Check to see if MailVibes is still listed among the installed extensions and remove it by clicking on the remove button.
Then to reinstall MailVibes:
1) Click here to install MailVibes. Select ‘Add to Chrome’ followed by ‘Add extension’.
2) Log into the Gmail account you want to link with MailVibes by clicking on ‘Connect with Google’.
3) Lastly, go to Gmail to complete the installation process.
1) Click on the following link. “Add MailVibes extensions”
2) Click the “Add to Chrome” button
3) Once you have done that, click the “sign in with Google” button to complete the installation and activate MailVibes in your email account.
Yes, MailVibes can be used to track emails sent using Gmail’s schedule send feature.
To use MailVibes in Chrome incognito mode, follow these steps:
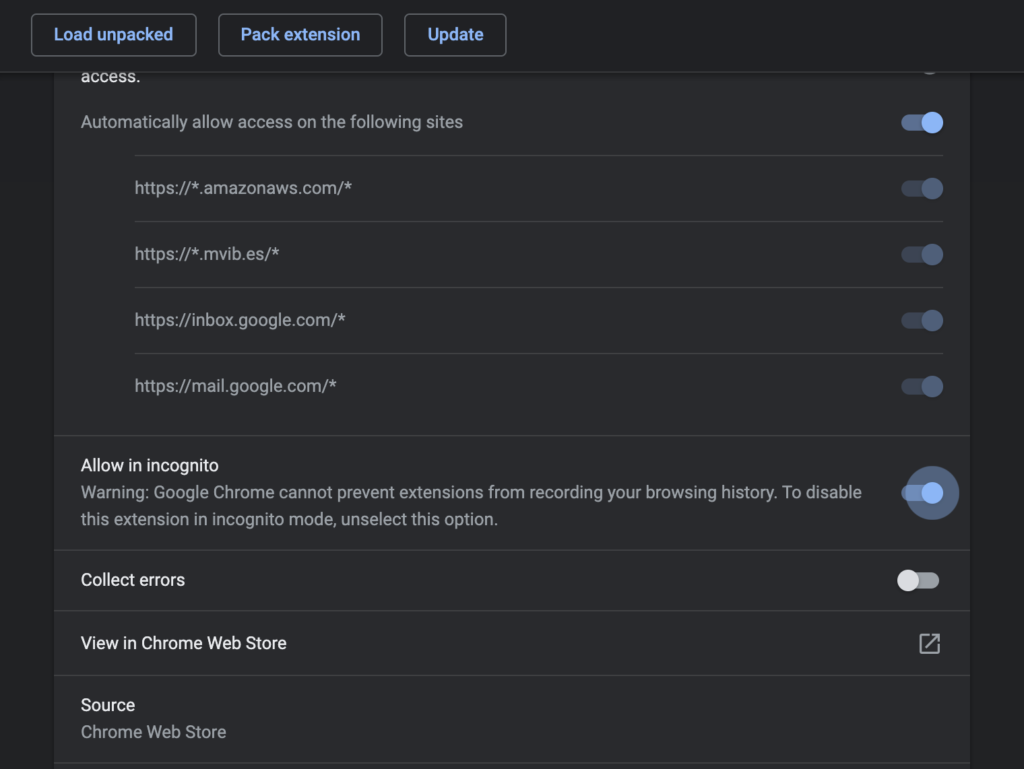
1) Click the three dots at the top right of your Chrome browser -> More Tools -> Extensions.
2) Look for MailVibes in your list of extensions then click ‘Details’.
3) Check the ‘Allow in incognito’ option so that it appears as shown below.
4) Click the three dots at the top right of your Chrome browser ->New incognito window.
5) Log into Gmail in the new incognito window you’ve opened.
Mailvibes shouldn’t cause your emails to be blocked or classified as a spam. Mailvibes uses Gmail delivery systems (Gmail SMTP server) to send your emails, this means:
a) Your emails are always correctly sent and delivered with the best available email technology (Gmail)
b) Mailvibes just adds a tracking pixel to your emails, but doesn’t send your emails. Adding a tracking pixel to your emails shouldn’t cause any problem at all.
c) In case your emails are not received or classified as spam, it means that the recipient email service (email server, firewall or antivirus) made a false positive. This means that the recipient email service believes your email is dangerous or spam.
Some reasons for a false positive:
- The subject/body of the email is marked as spam by the spam filter. there are words in the email that the spam filter doesn’t like.
– Recipient spam filter rules are too strict or poorly configured.
– Your email as a sender email is classified as a spammer by the spam filter.
- Mailvibes tracking pixel (Mailvibes) is marked as something dangerous by the firewall / antivirus
– Recipient’s email server is poorly configured
- Sender email is blacklisted
– Sender email server is blacklisted
The website mail-tester.com is free to use and can also help you determine why your emails aren´t being delivered to inbox.
In conclusion, if an email sent with Mailvibes doesn’t arrive to the recipient, the problem is in the recipient email service, but not in Mailvibes.
For technical and also ethical reasons (they could be classified as espionage), MailVibes does not specifically inform you when your emails have been forwarded or to whom they have been forwarded.
However, if an unusually high number of openings are generated for a particular email you have sent, you can generally assume that the email has been forwarded.
When your emails are forwarded to someone else and that person opens the forwarded email / downloads the tracking pixel, you will receive a notification. However, if the recipient of the forwarded email does not use MailVibes, this opening will be attributed to the recipient of the original email since MailVibes cannot technically (and legally) trace the forwarded emails, meaning that it cannot identify that it was not the original. recipient who opened the email.
Some problems with MailVibes can be resolved by updating the MailVibes extension.
Chrome usually sends extension updates gradually over a few hours / days. If you want to force an update of the MailVibes extension to speed up the process, you can do it manually:
1) Open a new tab in Chrome, copy / paste chrome: // extensions /? Id = ndnaehgpjlnokgebbaldlmgkapkpjkkb in the address bar and then press Enter.
2) Activate the Developer Mode option in the upper right corner of the screen and then click the Update button.
If this doesn’t work, reinstall the MailVibes extension in your browser. Instructions explaining how this can be done can be found here.